How to Automate AWS Backup from EC2 to S3 Bucket

This post provides a clear, detailed, step-by-step guide on how to use a bash script to automate the backup of data from Amazon EC2 instances to S3 buckets. It walks you through all the necessary steps, including configuring the timing of backups, setting up email notifications, and setting up the prerequisites. If you’re looking to automate your backups, this is the guide for you.
STEP 1: Create an S3 Bucket
Use Terraform or cloud formation to create an S3 bucket where the backups will be stored. You can use any text editor.


STEP 2: IAM Role for EC2
You create an IAM role that grants EC2 instances permissions to take backups and upload them to S3. Below are the steps for creating an IAM Role.
- Open the IAM console in the AWS Management Console.
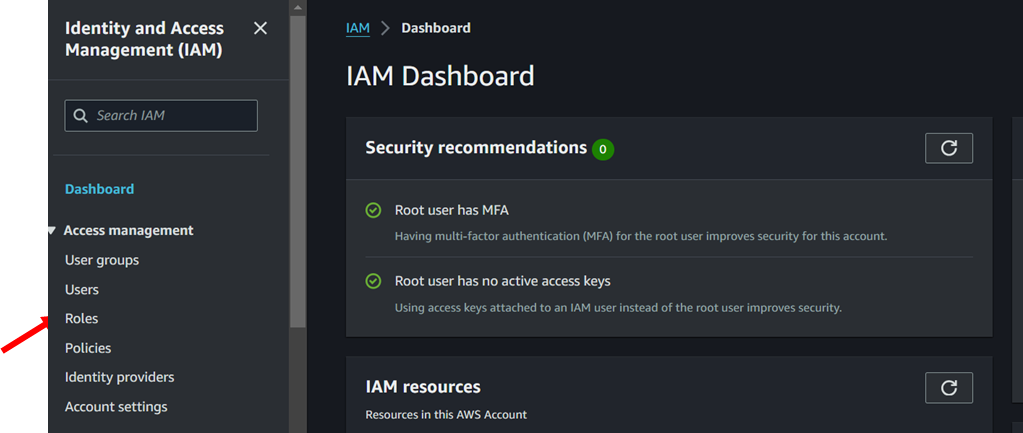
In the navigation pane, choose “Roles” and then choose “Create role.

2. Select “EC2” as the service that will use this role, and then choose “Next: Permissions”.
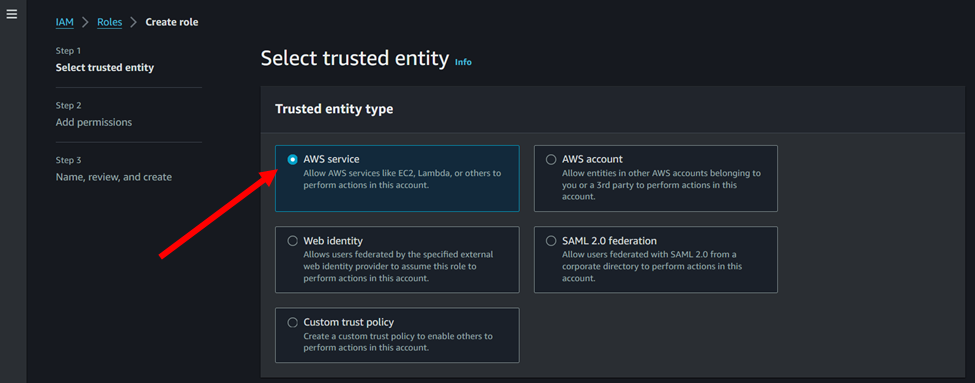
3. In the use case select EC2.

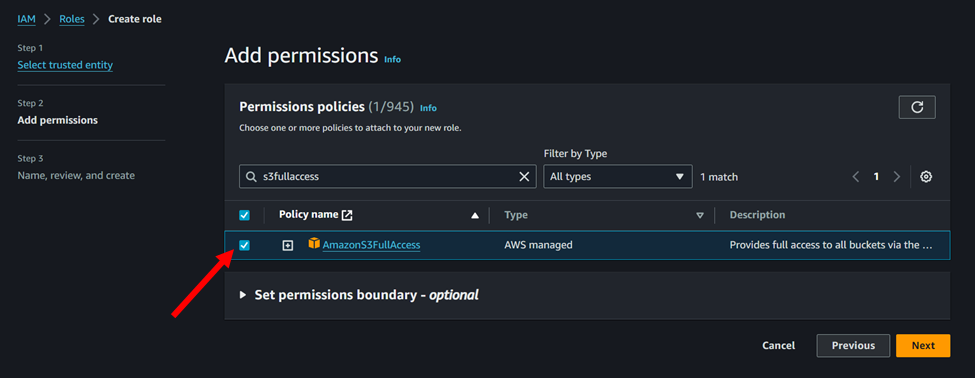
4. Type S3FullAccess in the search bar and attach this policy to the role: AmazonS3FullAccess.
5. Give a name to the role and click on the create button.
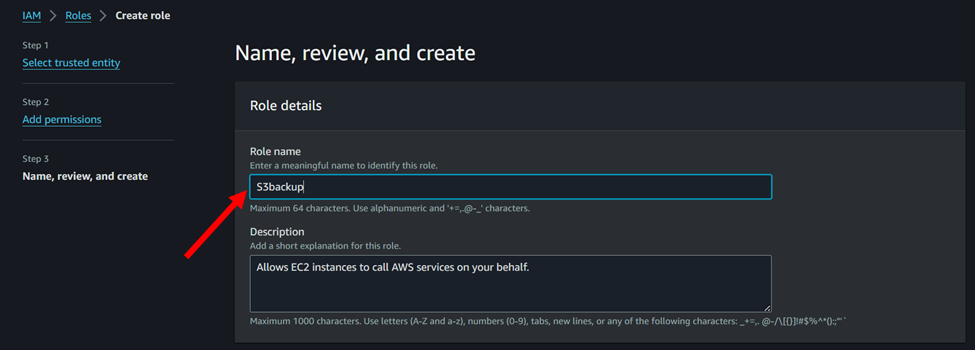

STEP 3: Create an EC2 Instance and attach the IAM Role.
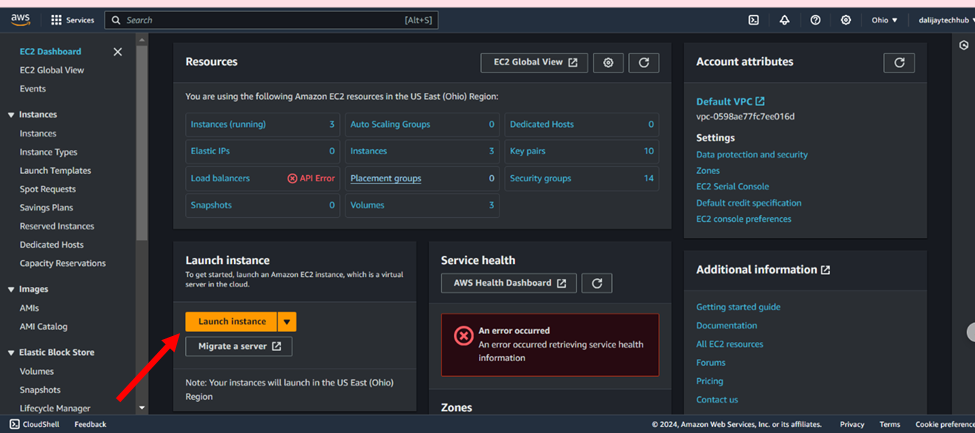
Before you begin, ensure you have access to the AWS Management Console by signing in with your AWS account credentials. If you don’t have an AWS account, create one by following the simple sign-up process on the AWS website. After signing in to the AWS Management Console, navigate to the EC2 dashboard by typing “EC2” in the services search bar at the top of the page and selecting “EC2” from the search results. This will take you to the EC2 console, where you can manage your instances and perform various EC2-related tasks.
- Click on the launch Instance as shown in the diagram below.
2. Assign a Name to Your EC2 Instance:
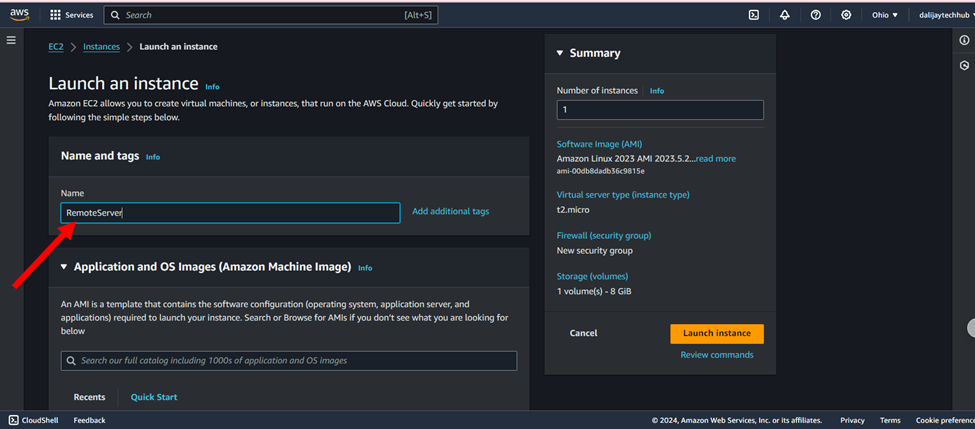
Assign a descriptive name to your EC2 instance to simplify the identification and management of your resources. Choosing a meaningful name will make it easier to distinguish your instance from others in the future. For this example, enter “RemoteServer” as the name for your EC2 server. This will help you quickly identify your instance in the EC2 console.
3. Select an Amazon Machine Image (AMI) type:
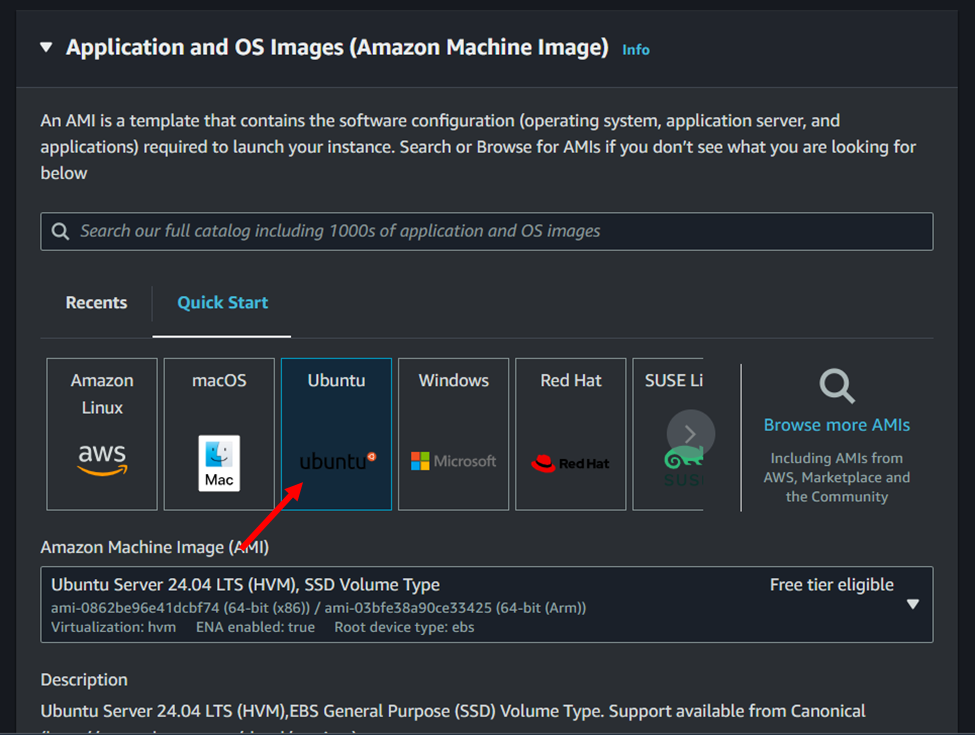
Choose an Amazon Machine Image (AMI), that contains the operating system and software required for your instance. AWS and the AWS Marketplace offer a diverse range of AMIs to suit various needs. Browse the available options and select the AMI that best fits your requirements. In this example, select Ubuntu as the operating system for your instance. This will provide a stable and secure foundation for your EC2 server.
4. Select the Instance type:
In this step, you select the instance type for your EC2 instance. Instance types are categorized based on their memory, CPUs, storage, and networking capacity. Each instance type is designed for specific workloads. For this example, select t2.micro, which is a general-purpose instance type that provides a balance of compute, memory, and network resources. It’s a suitable choice for running basic applications and workloads that don’t require significant resources.

5. Create a Key Pair:
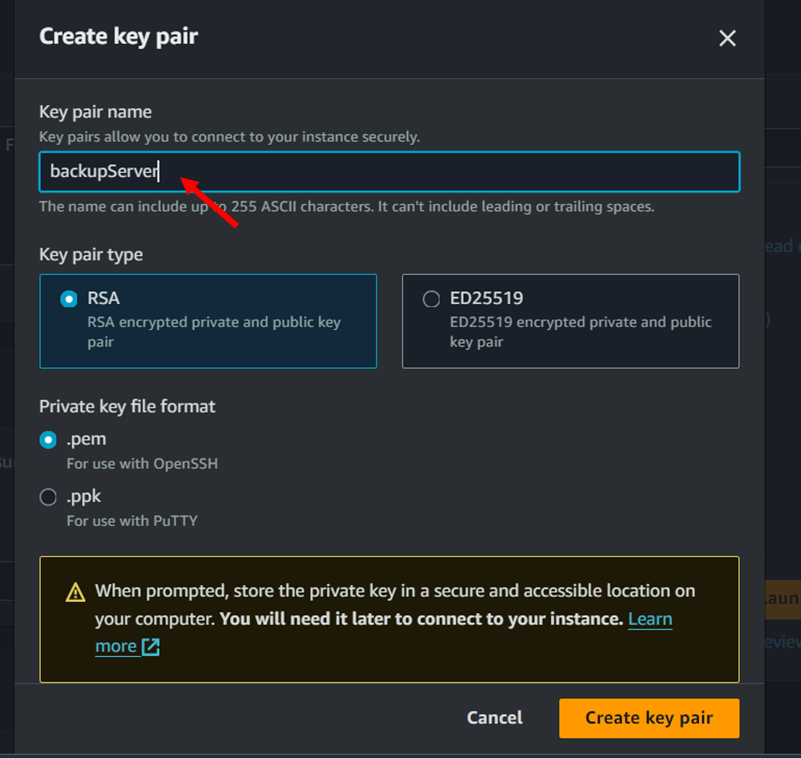
To securely access your EC2 instance from your local machine, you need to create a key pair. A key pair consists of a public key that is stored by AWS, this key is used to authenticate your instance, and a private Key which is downloaded to your local machine, this key is used to establish a secure connection with your EC2 instance. By creating a key pair, you’ll be able to securely access your instance and protect it from unauthorized access. Follow the prompts to create a new key pair by clicking on create new key pair as shown in the picture or use an existing one by clicking on the select arrow. Be sure to download and save the private key securely, as you won’t be able to retrieve it again.

6. Type a name for your key pair. I chose the name backupServer, but feel free to choose something more descriptive of your specific use case.
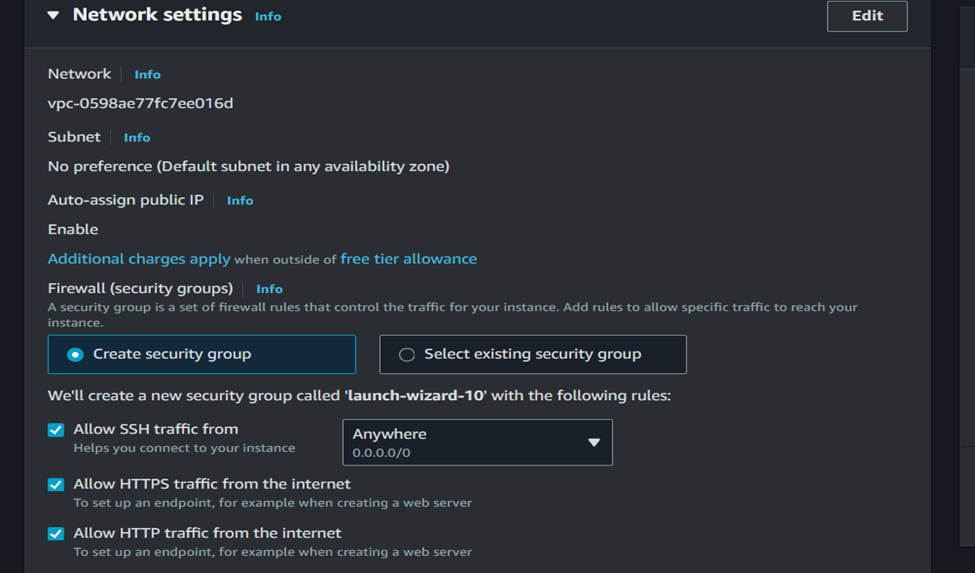
7. Configure Instance Details, by allowing http, https, and ssh in the network setting as shown in the diagram below. This will enable you to SSH into your EC2 instance.
8. Review and Launch:
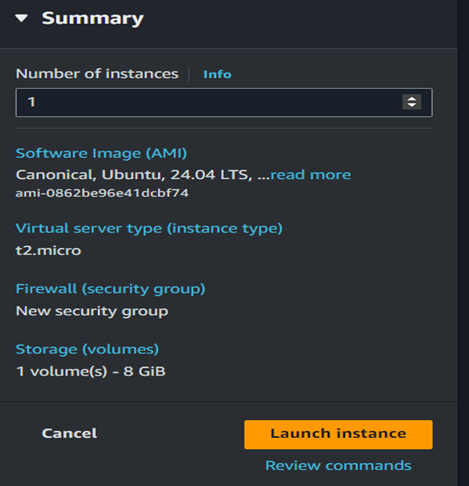
Before launching the instance, review the configuration details to ensure everything is set up correctly. Click on the lunch instance button.
STEP 4: Attach the IAM Role to the EC2 instance
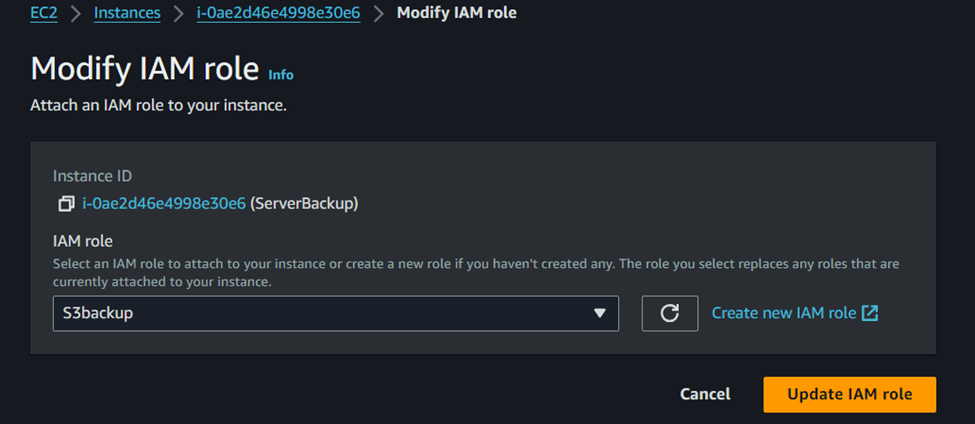
- Go to an EC2 instance dashboard and click EC2 instance go to Actions and Security finally click Modify IAM Role

2. Next, Modify the IAM role, click the previously created IAM Role, and click Update the IAM role.
STEP 5: Connect to the EC2 Instance
Connect to the EC2 Instance by typing the following command in the terminal. I am using Git bash in VS Code.

The cd Downloads will change the directory to the download folder where the keypair was saved. Again, the chmod 400 project1kp.pem will set the permission for the keypair file. The permission mode 400 can be broken down as follows:
* 4: The owner has read permission (r--).
* 0: The group has no permissions (---).
* 0: Others have no permissions (---).
This command “ssh -i project1kp.pem ubuntu@ec2–3–136–11–77.us-east-2.computer.amazon.com”
Here’s what each part of the command does:
ssh: The SSH command itself, which is used to establish a secure connection to a remote server.-i: The option to specify the private key file to use for authentication.project1kp.pem: The path to the private key file (in this case, it's assumed to be in the current working directory). This file is used to authenticate the SSH connection.ubuntu: The username to use for the SSH connection. In this case, it's ubuntu which is a common default username for Ubuntu-based EC2 instances.ec2–3–136–11–77.us-east-2.computer.amazon.com: The hostname or public DNS name of the EC2 instance you're trying to connect to. This is an Amazon-provided DNS name that resolves to the public IP address of your EC2 instance.
STEP 6: Install the mail utilities

STEP 7: Configuring your Mail Server
Set up your mail server which will enable you to receive email notification at every stage of the backup process. Type the following command as shown in the diagram below.

Here’s a breakdown of the command:
sudo: Thesudocommand is used to run the subsequent command with superuser privileges, which is necessary to install packages on Ubuntu-based systems.apt: Theaptcommand is the package manager for Ubuntu-based systems, which is used to install, update, and remove packages.install: Theinstalloption tellsaptto install a new package.mutt: Themuttpackage is the email client that you want to install.-y: The-yoption is used to automatically answer "yes" to any prompts during the installation process, which allows the installation to proceed without requiring manual intervention.
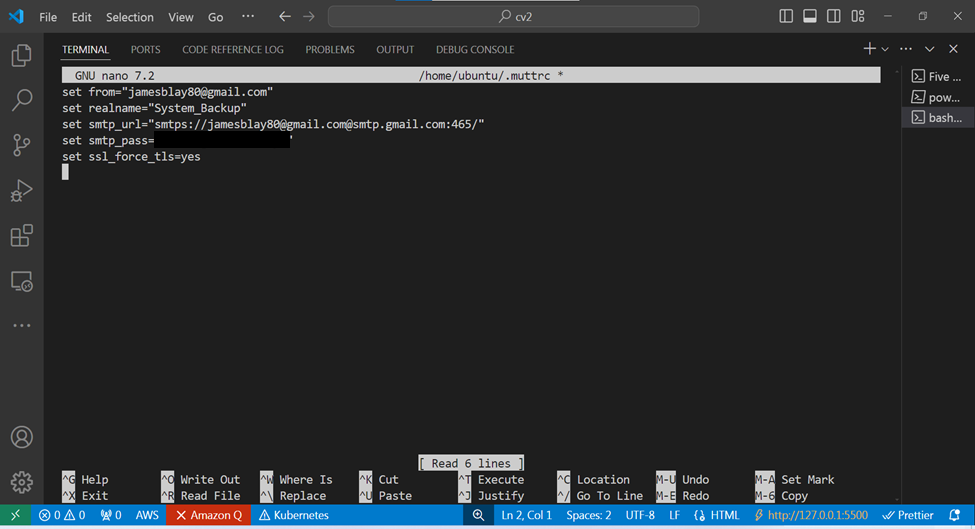
The commands above are used to configure the Mutt email client to send emails using a Gmail account. Here’s a breakdown of each command:
1. set from ="jamesblay80@gmail.com"
This command sets the from address, which is the email address that will be used as the sender's address when sending emails. In this case, it's set to jamesblay80@gmail.com.
2. set realname="System_Backup"
This command sets the realname variable, which is the name that will be displayed in the From header of the email. In this case, it's set to System_Backup.
3. set smtp_url="smtp://jamesblay80@gmail.com@smtp.gmail.com:465/"
This command sets the smtp_url variable, which specifies the SMTP server to use for sending emails. In this case, it's set to smtp.gmail.com with the following settings:
smtp://: The protocol to use for sending emails (SMTP).jamesblay80@gmail.com: The username to use for authentication.smtp.gmail.com: The hostname of the SMTP server.465: The port number to use for the SMTP connection (in this case, the default port for SSL/TLS encryption).
4. set smtp_pass="btoi elbx twgz vcwg"
This command sets the smtp_pass variable, which specifies the password to use for authentication with the SMTP server. In this case, it's set to "btoi elbx twgz vcwg" (which is the Google app password). For more information on how to set a Google app password click on this link. https://www.youtube.com/watch?v=J4CtP1MBtOE
5. set ssl_force_tls="yes"
This command sets the ssl_force_tls variable, which forces Mutt to use SSL/TLS encryption when connecting to the SMTP server. In this case, it's set to yes, which ensures that the connection is encrypted.
When you finish the configuration press CTRL + O and hint enter on the keyboard to save the configuration and CTRL + X to exit from the window.
STEP 8: Setting Up the Automation Bash Script
Now write the bash script to automate the backup process and transfer the backup file onto the S3 bucket. You can use any editor either Vim, Nano, or GNU Emacs.

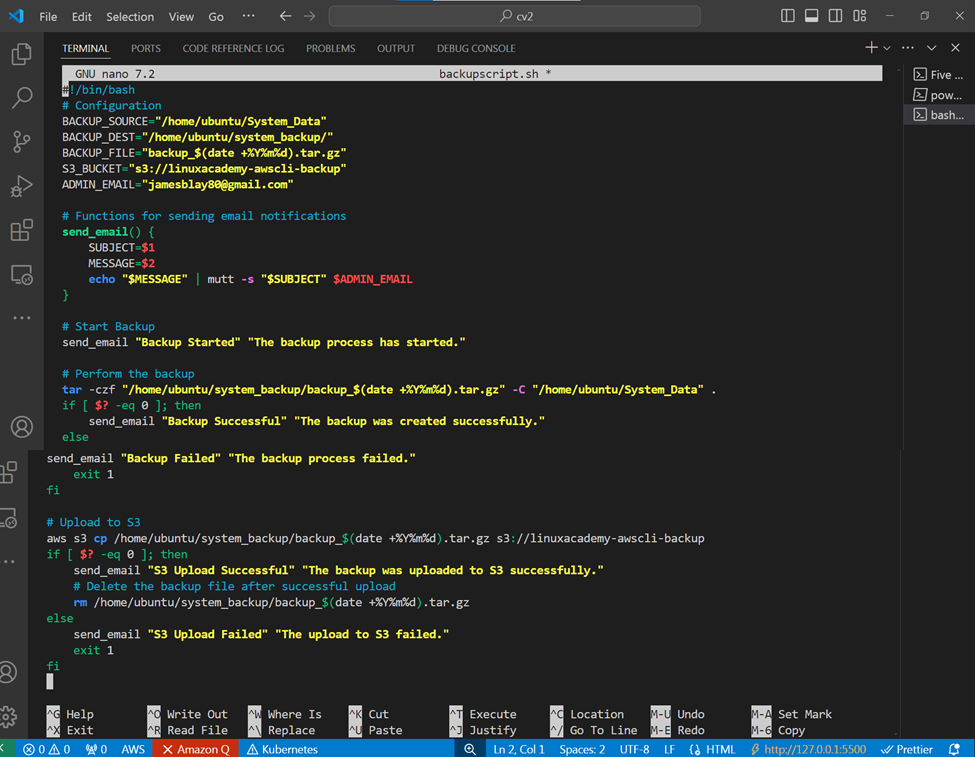
This is a Bash script that automates the backup of a system’s data and uploads it to an Amazon S3 bucket. Here’s a breakdown of the script:
The script starts by defining several configuration variables:
BACKUP_SOURCE: The directory to be backed up (/home/ubuntu/System_Data)
BACKUP_DEST: The directory where the backup file will be stored (/home/ubuntu/system_backup/)
BACKUP_FILE: The name of the backup file, which includes the current date (backup_$(date +%Y%m%d).tar.gz)
S3_BUCKET: The Amazon S3 bucket where the backup file will be uploaded (s3://linuxacademy-awscli-backup)
ADMIN_EMAIL: The email address that will receive notifications about the backup process (jamesblay80@gmail.com)
Functions: The script defines a function send_email that sends an email notification using the mutt command. The function takes two arguments: SUBJECT and MESSAGE.
Backup Process:
The script then starts the backup process by sending an email notification with the subject “Backup Started”. The backup is performed using the tar command, which creates a compressed archive of the BACKUP_SOURCE directory and stores it in the BACKUP_DEST directory. The archive file name includes the current date. If the backup is successful, an email notification is sent with the subject “Backup Successful”. If the backup fails, an email notification is sent with the subject “Backup Failed”, and the script exits with a non-zero status code.
Upload to S3
After the backup is complete, the script uploads the backup file to the specified S3 bucket using the aws s3 cp command. If the upload is successful, an email notification is sent with the subject “S3 Upload Successful”, and the backup file is deleted from the local system. If the upload fails, an email notification is sent with the subject “S3 Upload Failed”, and the script exits with a non-zero status code.
When you finish the configuration press CTRL + O and hint enter on the keyboard to save the configuration and CTRL + X to exit from the window.
STEP 8: Make the Script Executable
Once you have written your bash script, you will need to make it executable before you can run it. To do this, you can use the chmod command.
chmod +x backupscript.sh
This command will change the permissions of the file named “backupscript.sh” so that it is executable.

STEP 9: Run the script manually to test if the script is working. Type this command below.

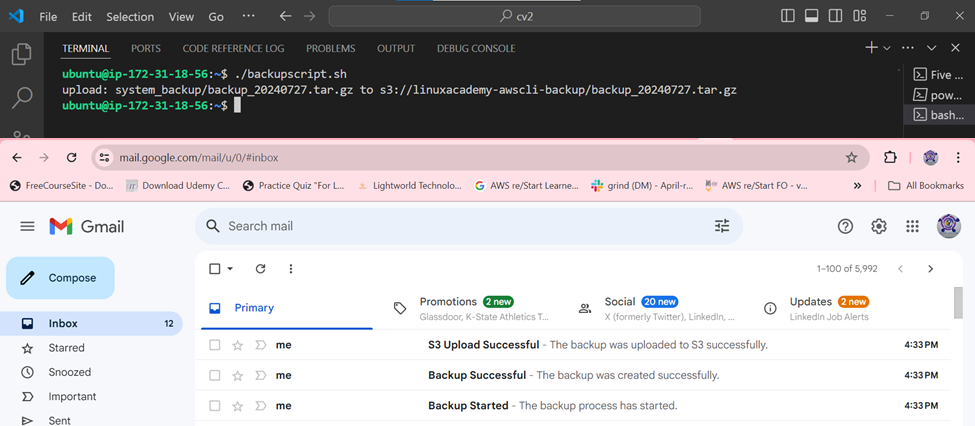
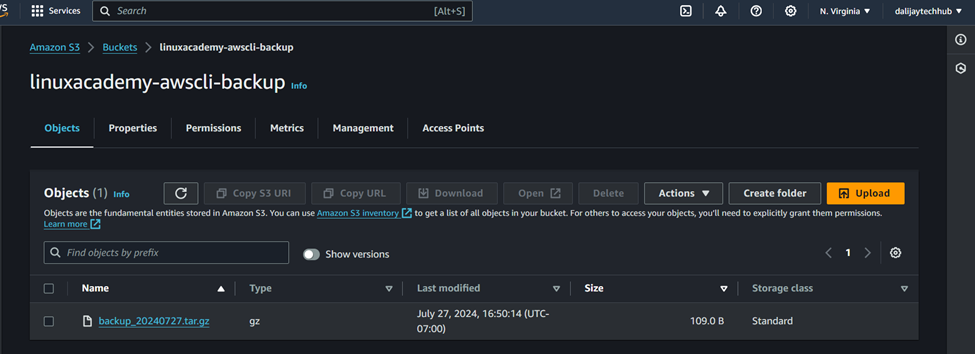
When you run the script and it’s successful, you will receive an email notification and a notification in the command line as shown below.
STEP 10: Setting up a Cronjob
The final step is to set up a cronjob to run the backup script at the desired interval. To do this, you can use the crontab command.
crontab -e

This command will open the crontab file in a text editor. Add the following line to the crontab file:
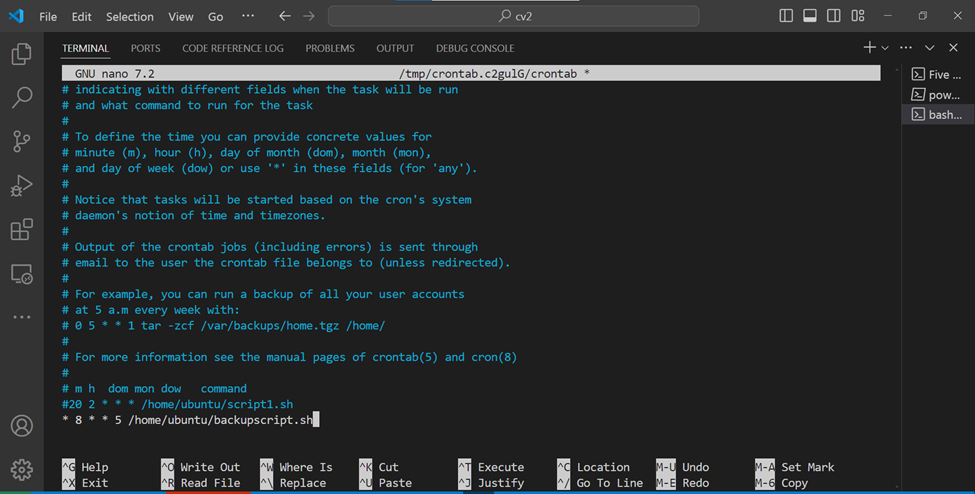
- 8 * * 5 /home/ubuntu/backupscript.sh
- Breakdown of the cronjob
0: minute (0–59)
8: hour (0–23) — 8:00 pm is equivalent to 20:00 in a 24-hour format
*: day of the month (1–31) — * means any day
*: month (1–12) — * means any month
5: day of the week (0–6) — 5 means Friday (0 = Sunday, 1 = Monday, …, 6 = Saturday)
This line tells cron to run the backupscript.sh file every Friday at 8:00 pm. Save the file and exit the editor. You can now test the cronjob by waiting for the specified time to elapse and then checking the email account specified in the ADMIN_EMAIL variable. You should receive an email notification indicating that the backup was successful. This setup automates the process of taking EC2 instance backups and storing them in an S3 bucket using a bash script. Make sure to customize it according to your specific requirements and security best practices.


